Decorating a cake can be an intimidating prospect for beginners, but it doesn’t have to be! With a few simple techniques and a little practice, you can transform your homemade cakes into stunning creations that will impress your friends and family. This comprehensive guide, “Sweet Sensations: Your Beginner’s Guide to Effortless Cake Decorating – From Frosting Fundamentals to Simple Techniques and Creative Touches, Transforming Your Homemade Cakes into Masterpieces of Delight,” will walk you through the basics of cake decorating, providing you with step-by-step instructions and helpful tips to create beautiful and delicious cakes.
I. The Foundation: Essential Tools and Ingredients
- Cake: A cooled, leveled cake is the canvas for your decorating masterpiece.
- Frosting: Choose a frosting that complements your cake flavor. Buttercream, cream cheese, and chocolate ganache are popular choices.
- Offset Spatula: For smooth and even frosting application.
- Piping Bags and Tips: For creating decorative borders, designs, and lettering.
- Turntable (Optional but Helpful): For rotating the cake while frosting.
- Serrated Knife: For leveling the cake layers.
- Cake Leveler (Optional): For precise cake leveling.
- Decorating Comb or Scraper: For creating textured frosting designs.
- Sprinkles, Candies, and Other Decorations: For adding finishing touches.
II. Frosting Fundamentals: Achieving a Smooth and Even Finish
- Level Your Cake: Use a serrated knife or cake leveler to remove any doming from the cake layers, ensuring a stable base.
- Crumb Coat: Apply a thin layer of frosting to the entire cake to trap crumbs. This prevents crumbs from showing through the final layer of frosting.
- Chill the Crumb Coat: Place the cake in the refrigerator for 15-20 minutes to allow the crumb coat to set.
- Final Frosting Layer: Apply a generous layer of frosting to the cake, using an offset spatula to smooth it out.
- Smooth the Sides: Hold the offset spatula vertically and gently scrape around the sides of the cake to create a smooth finish.
- Smooth the Top: Use the offset spatula to smooth the top of the cake, creating a flat and even surface.
III. Simple Decorating Techniques for Beginners:
- Sprinkles and Candies:
- The easiest way to add a festive touch to your cake.
- Sprinkle them over the frosting or create patterns and designs.
- Piping Borders:
- Use a piping bag fitted with a star or round tip to create decorative borders around the top and bottom of the cake.
- Practice piping on a piece of parchment paper before decorating the cake.
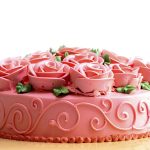
- Piping Rosettes:
- Use a piping bag fitted with a star tip to create small swirls of frosting.
- Start in the center of the rosette and pipe in a circular motion.
- Piping Simple Flowers:
- Use a piping bag fitted with a petal tip to create simple flowers.
- Start with a small dot of frosting in the center of the flower and pipe petals around it.
- Creating a Textured Finish:
- Use a decorating comb or scraper to create lines or swirls in the frosting.
- This adds visual interest and texture to your cake.
- Fruit Decorations:
- Fresh berries, sliced fruits, or fruit compotes add a burst of flavor and freshness.
- Arrange them on top of the cake or create a fruit border.
IV. Creative Touches: Adding Your Personal Flair
- Color Play: Use food coloring to create vibrant and eye-catching frosting colors.
- Edible Flowers: Add edible flowers for a touch of elegance and whimsy.
- Chocolate Shavings: Create chocolate shavings by using a vegetable peeler on a block of chocolate.
- Stencils: Use stencils to create intricate designs on your cake.
- Personalized Messages: Use a piping bag to write personalized messages on your cake.
V. Tips for Success:
- Practice Makes Perfect: Don’t be afraid to experiment and practice your decorating skills.
- Start Simple: Begin with basic techniques and gradually progress to more complex designs.
- Use Quality Ingredients: High-quality ingredients make a noticeable difference in taste and appearance.
- Chill Your Cake: A chilled cake is easier to frost and decorate.
- Don’t Overcrowd: Avoid adding too many decorations, as this can make the cake look cluttered.
- Have Fun! Cake decorating should be an enjoyable and creative experience.
VI. The Final Flourish: Presenting Your Masterpiece
- Choose a Cake Stand: Display your cake on a beautiful cake stand to showcase your decorating skills.
- Add Candles: For birthday cakes, add candles to create a festive atmosphere.
- Take Photos: Capture your cake creation with photos to share with friends and family.
- Enjoy the Compliments: Savor the compliments and appreciation from your guests.
By following these beginner’s tips and techniques, you can transform your homemade cakes into stunning masterpieces that will delight your taste buds and impress your guests.